



FAQ
GO2SIGNALSRECEIVERGO2MONITORGO2DECODEGO2ANALYSE
GO2signals
Change of the GUI language from German to English?
In the program directory edit the file "prolang.cfg" and replace "de" with "en"
Last update on 2024-03
Problem when working without LAN adapter
If you have a problem running software when the LAN adapter is switched off, you can try to add the Microsoft Loopback Adapter:
- In the Device Manager select click Add legacy hardware.
- In the Add Hardware Wizzard, select Install the hardware that I manually select from a list (Advanced)
- In the Common hardware types list, click Network adapters, and then click Next.
- In the Manufacturer list, click Microsoft.
- In the Network Adapter list, click Microsoft Loopback Adapter, and then click Next twice.
- If a message about driver signing appears, click Continue Anyway.
- In the Completing the Add Hardware Wizard dialog box, click Finish, and then click OK.
Last update on 2024-03
Alphabets like Arabic, Chinese etc.?
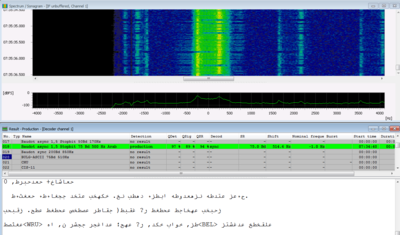
go2MONITOR and go2DECODE can display Unicode in the output window.
In some decoders, the selection of the output alphabet like Hebrew, Cyrillic, Arabic etc. is already implemented.
It is possible to add your own alphabets to the software. Depending on the decoder, some changes may have to be made to the decoder.
Last update 2024-03
Hard disk space required for recording
Narrowband/Wideband recording/DDC
1 MHz (float 2 x 32 bit):
- 28.8 GBytes/h
Option Wideband Recording
1 MHz (integer, 2 x 16bit):
- 3600 (s/h) x 1E6 (1/s) x 32 bit = 115 200 000.0 bits/h or 14.4 GByte/h
- Add about 10% for FFT data
- Total 16 GByte/h/MHz
Last update on 20243-03
How can I record signals?
If your receiver delivers IQ data
- If the receiver is supported by go2signals, use g2MONITOR for WB and NB recordings.
- If the receiver is not supported, then use the receiver software for recording. Many IQ data files can directly get played back from the go2MONITOR or go2DECODE (like PLATH, IZT, WiNRADiO, Perseus, etc.).
Sometimes the files need to be converted to the correct IQ format (e.g. for SignalHound etc.). You can do this with your own software or with the SoX format converter - SDRConsole can record in go2signals format AND also stream live directly to go2MONITOR.
If your receiver delivers NO IQ data
- Invest in a SDR like SIR, PERSEUS, WiNRADiO etc.
- Alternatively, you can also use an SDRplay, Airspy or RTL dongle and connect it to the IF output of your receiver to receive the IQ data.
Last update on 2024-03
How to connect to a webradio?
Setup Stereo Mix in Recording device and use it as default input
- If it is missing then maybe its not enabled in the sound-card console settings. Check windows operating system.
If your sound card does not support stereo mix, then use virtual audio cable (http://software.muzychenko.net/eng/vac.ht. Use the audio cable as default - Tune the station in the web radio
- In go2MONITOR or go2DECODE select go2DECODE/DANA as input (if it is missing, set it up for port 44001)
- Start DANA and select the sound card as input, then press the play button to start streaming
- Tune the center frequency, adjust levels
- Happy decoding!
Remarks:
Add additional DDC channel bandwidths for go2MONITOR. I recommend 1.5, 2.0, 2.5 and 3.0 kHz. This makes tuning much easier, see: "How to add additional DDC bandwidths"
Last update on 2024-03
Adding META Data to wav files
The “wavetxt.exe” (available on request) application serves to provide the additional information required for the signal processing software if they are not contained in the wav file or if they are wrong. This additional txt-file can be generated with the application wavetxt.exe or be setup manually and must be stored together with the .wav file in the same directory.
If you have a test.wav file then the associated txt-file is test.txt!
The structure of the txt-file is:
// Comments 0.0// Signal-Number, File-Number(not required)COMPLEX// COMPLEX or REAL signal1// Number of channels,(not required, 1) 10250// Absolute frequency(not required, -1) 48000.00000// Sample rate (Hz) of the wav file(can be modified to correct errors) 3631 38282000 0// Preprocessing parameters(not required)
The txt-file can be automatically generated with the application wavetxt.exe. The tool is normally started from the command line or from a batch file.
Syntax:
wavetxt [-cx|-re] [f=
Meaning:
- -cx, complex
- -re, real]
- f= x, absolute receiver center frequency (required if the application should display the true signal frequency
Example
wavetxt –cx f=10250 test.wav (will produce the structure above)
Important:
- The sample rate needs not to be specified, as the value from the wav file will be used. Later you can modify the value to correct errors!
- Avoid spaces in file names.
Last update on 2024-03
CodeMeter license sharing with standard license
Use a USB-Device-Server DS-600 from Silex or a similar products.
Setup depends on LAN structure (VPN, Router, firewalls etc.)
Last update on 2024-03
CodeMeter license sharing with special license
With a Floating License
The floating license must be requested when ordering.
The
CodeMeter license server offers services to other CodeMeter clients which run in the same LAN (Local Area Network) or in a distributed setup. On all computers where a go2signals application is correctly installed a CodeMeter license server is set up. When the go2signals application is started on a computer then the software will communicate with the CodeMeter license server on this computer. The CodeMeter client then gets a license for running the application either from the locally plugged in CodeMeter license server or it searches the LAN for other CodeMeter license servers.The CodeMeter network license server may be located in the LAN, in the WAN, or operated in the cloud.
Important:
- You need a license with enabled "License sharing" and on the client computer the correct "sharing enabled" license file (default.maw) must be installed. Must be specified if you order!
- Searching for a license in a large network can be very time-consuming (up to 1-2 minutes)
Setting up a basic CodeMeter Server
- Install the CodeMeter software on the server computer (if not already installed with a go2signals product).
- Connect the dongles on the server computer
- In the CodeMeter webAdmin, Configuration, Server: Enable the Network Server
- Restart CodeMeter
- Depending on the network, setup routers, firewalls etc.
- For additional details consult the CodeMeter manual
Setting up a CodeMeter Client
- In the CodeMeter webAdmin, Configuration, Basic, Search List:
If the server is not in the same sub-net, enter the Server Name or the IP address to the search list. - Restart go2MONITOR, go2DECODE or go2ANALYSE and check if the software will start. During start-up, you should see a message like “Scanning for Network dongle, please wait”
In case of problems:
- Remove local dongles
- Check if in your network port 22350 is not blocked (router, firewall, mobile network etc.)
Last updte on 2024-03
Receiver
CRFS: How to convert XDAT files to wav files
- Using SOX and wavetxt
- The values for the sampling rate and the center_frequency can be taken from the corresponding xhdr files
conv_xdat2wav.bat content:
<code>rem usage: filename, samplingrate center_frequency</code><code>@echo off</code><code>del %1.txt</code><code>del %1.wav </code><code>sox -t raw -r %2 -b 16 -e signed-integer -c 2 %1 -t wav %1.wav</code><code>wavetxt -cx %1.wav f=%3</code>
Last update on 2024-03
TCI Blackbird: How to convert cap files to wav filesolor sit amet
Important note: From version 20.2 on, blackbird cap files can be processed directly from go2MONITOR!
- Load the file as raw data into Audacity. Use the following settings:
- Signed 32 Bit
- Big Endian
- 2 channels (stereo)
- Offset 512 Byte
- Sampling rate depends on the recording
- After loading, amplify the signal for a peak level of -20 dB.
- Export to a wav file
- Use the wavtext tool to add the following metadata into a txt file:
- File type: complex
- Sampling rate depends on the recording
- Center frequency depends on the recording
That's it
If you have many files, write a batch file for automatic processing.
You can also use SOX instead of Audacity to do the conversion.
Last update on 2024-03
Convert WiNRADiO files to WAV file
- You have to produce a *.DDC file
- Rename it to *.wav.
- Then with the wavetxt application produce the required separate file with all the meta-data inside (center, frequency).
- If you playback the file without this text file, then only "relative" frequencies are displayed.
Last update on 2024-03
Convert PERSEUS file to WAV file
PERSEUS files contain already all the required meta-data. Just open the file (or drag and drop) and start decoding.
Last update on 2024-03
Use of RTL2832U dongle
Download newest "zadig" from http://sourceforge.net/projects/libwdi/files/zadig/
- Insert your RTL2832U dongle into an USB port
- Run zadig.exe
- Select "Options", "List all Devices"
- Select "Bulk-In,_Interface_(Interface_0)" (or your listed RTL-Device like RTL2832)
- Check if WinUSB (v6.1.7600.16385) is selected
- Press "Install Driver" or "Reinstall Driver"
- Download the ExtIO_RTL.dll for RTL2832U devices. Unzip and copy the file ExtIO_RTL.dll to the go2MONITOR program directory
- Modify the receiver.conf file in the user directory according to your requirements or use the file already contained in go2MONITOR
- Start go2MONITOR Receiver Configuration and select the "RTL Dongle" as input device.
Note:
If you are switching to a different stick or if you change the USB port then reinstall your zadig driver.
Additional new drivers are on the internet. Follow the installation information for this receivers.
Last update on 2024-03
NARDA SignalShark: How to connect it
Step-by-Step Guide
This process should be checked with the latest VITA 49 driver. Many things have been changed and are now much easier to configure.
Assumptions, Requirements
- JumboFrames enabled on all devices, switches etc.
- Disconnect the DF antenna (ADFA) if you have go2MONITOR 20.1.1 (or older). Update to 20.2 if the antenna is required.
- Study the actual go2MONITOR and SignalShark manuals
- 169.254.155.1 : IP address SignalShark
- 169.254.155.2 : IP address computer (Laptop, server etc.)
- Sub net mask: 255.255.0.0, RX and computer addresses should be in the same network segment
- No DHCP (otherwise you must setup DHCP to always use the same addresses)
- No firewall (otherwise setup the correct IP addresses and ports)
- Windows10
Procedure
- Install go2MONITOR on your computer. Start go2MONITOR and load the correct license file.
- Connect the SignalShark with an Ethernet cable to your computer (or connect receiver and computer to a LAN)
- Setup/verify the IP address of the SignalShark (e.g. 169.254.155.1)
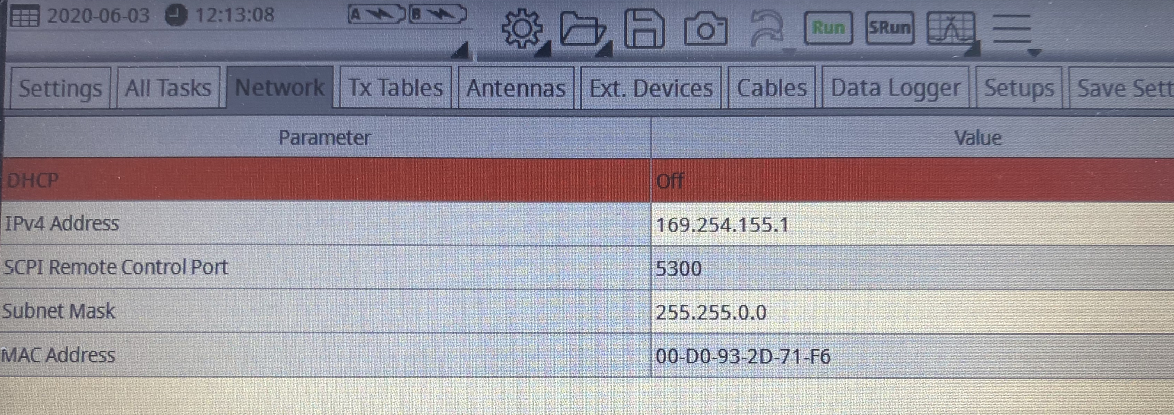
- Setup/verify the IP address of your computer (e.g. 169.254.155.2)

5. Check Jumbo frames
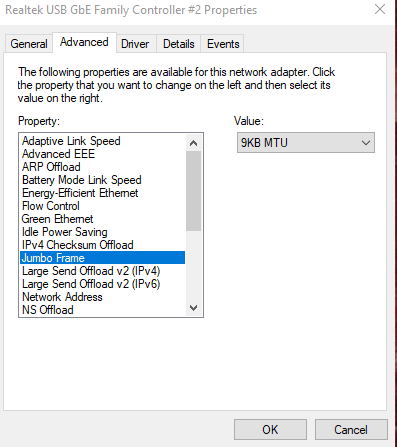
6. Ping your SignalShark. In Windows, hit Windows+R.
In the Run window, type “cmd” into the search box, and then hit "Enter". At the prompt, type “ping 169.254.155.1” and check if the SignalShark replies. If not, check your setup and LAN.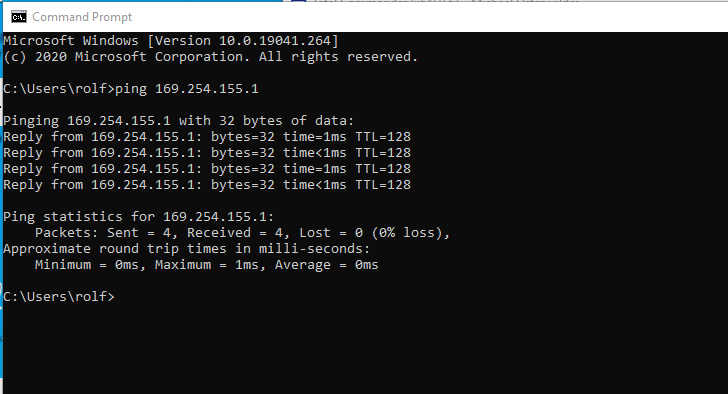
7. In go2MONITOR click on 'File', then click 'Wideband receiver configuration', then click "Yes" to open the Receiver Configuration window.
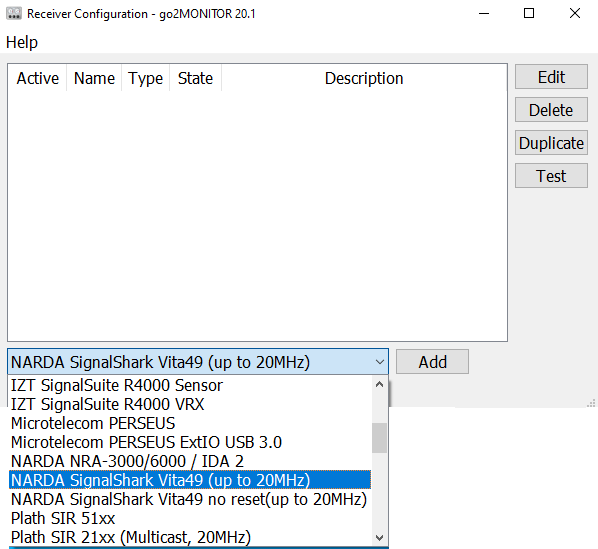
8. In the dropdown box, scroll down and select "NARDA SignalShark, Vita.49 (up to 20MHz) ". Click "Add" to add it to the list of receivers.
9. Check that "Active" is selected
10. Select "NARDA SignalShark, Vita.49 (up to 20MHz) " and then click on "Edit"
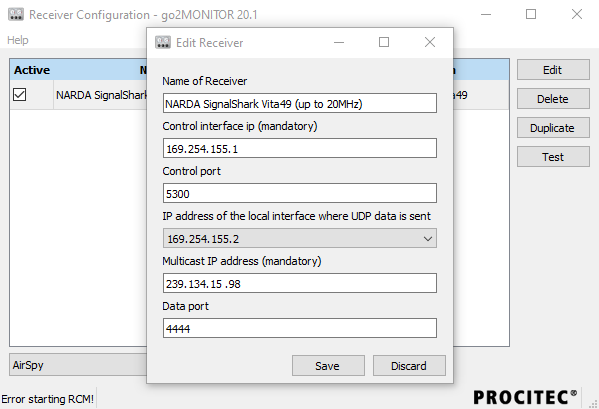
11. A new window will open. Now enter the SignalShark IP address into the field "Control Interface ip" field (e.g. 169.254.155.1) "Control port" should be 5300.
In the grey drop down box "IP address of the local interface where UDP data is sent" select the computer LAN interface that is used to connect to the receiver (e.g. 169.254.155.2). Normally you will only see one IP address. You must choose between several if there are multiple LAN interfaces or VPN.
"Data Port" don't change it (normally 4444)
Click "Save" to store your settings
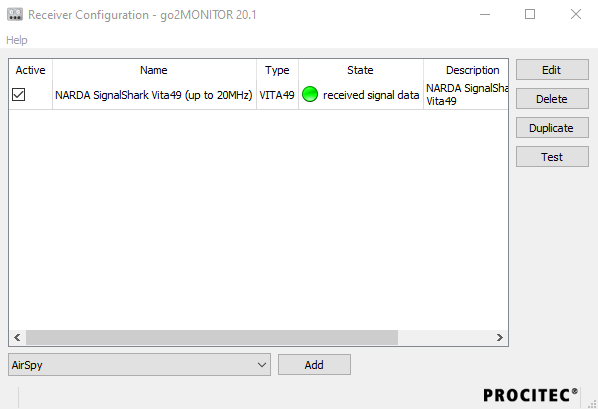
12. Click on "Test" and after a few seconds, the "State" field in the receiver list should indicate whether the setup was properly done.
13. Close the "Receiver Configuration" window and start go2MONITOR again
14. If go2MONITOR is running select "NARDA SignalShark, Vita.49 (up to 20MHz) in the "Input" drop down list.
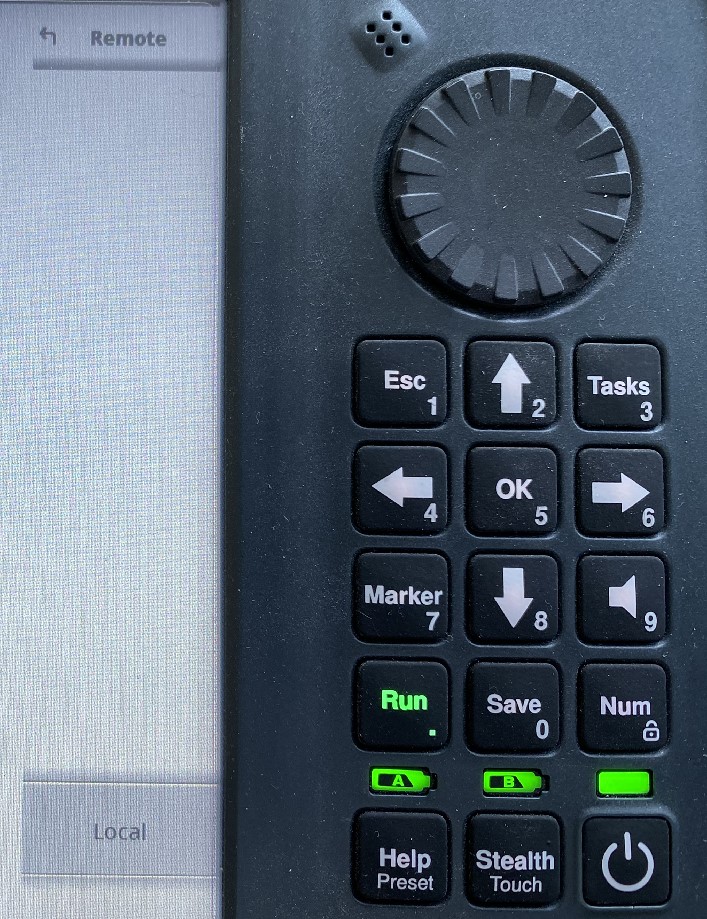
You should hear a 'click' from the SignalShark and its display goes all black with only one botton indicating 'local' (don't push that button !!!)
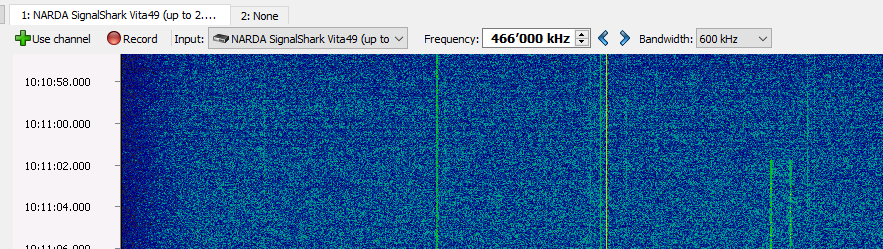
The receiver should be in remote mode
15. Enter now a frequency and bandwidth you like to monitor.
16. Start with a low bandwidth of 600 kHz and later check the limits set by the license or computer performance.
That's it
In Case of Problems
- Restart the computer and the receiver
- Check again all the parameters
- Open with Notepadd++ the file "c:\Users\xxxx\go2signals\go2MONITOR xx.x\receivers_wb\NARDA_SignalShark_20Mhz.conf".
Check if the IP addresses are like
and not like - If it does not work, you can also check whether the data is reaching the network adapter from the receiver. So check in the Task Manager how much data is arriving. Then check whether the data rate in the Task Manager changes when you change the bandwidth in go2M.
- Can you control the receiver, is it going to remote mode?
Last update e on 2024-03
ICOM R8600 Setup
- Download the installer and driver from:
https://www.icomjapan.com/support/firmware_driver/ - The software should run on windows 10/11
- The files in C:\Program Files (x86)\HDSDR
- ExtIO_ICR8600.dll
- HidCtrl.dll
- Must be copied to:
- c:\Program Files\procitec\go2monitor\32bit\
- A new, adapted receiver.conf template, must be copied to:
- c:\Program Files\procitec\go2monitor\32bit\templates\
- The receiver firmware must be at least 1.3
- The bandwidth must be set in the ExtIO GUI using arrow keys (up and down)
- The pull-down menu of the ExtIO GUI does not work properly
Last update on 2024-03
go2MONITOR
Remove the
f you see a DOS window in the background, you can remove it by changing the start_all.bat file.
In start_all.bat (application directory) replace:
start /D "%~dp0" As_controller.exe --noconsole
with:
start /B /D "%~dp0" As_controller.exe
Last update on 2024-03
Changing the data storage location
If you like to store the data in a different location
In SystemConfiguration.xml (application directory/sysconfig) replace:
<VARIABLE>ifserverpath</VARIABLE><VALUE>$_USER_PATH_$results</VALUE>
with:
<VARIABLE>ifserverpath</VARIABLE> <VALUE>d:\go2mresults</VALUE>
Last update on 2024-03
Connection of a GARMIN GPS device
Some GPS (e.g. Garmin 60 CSx) must be connected via USB connection.
go2MONITOR has only configurable inputs for the serial port.
Procedure
- Select an unused port in the "gpsdll.dll.settings" file
Example: COM6 4800 - Download and install GpsGate Splitter (Formerly Client) from https://gpsgate.com
- Setup of GpsGate
Input: Garmin-USB
Output: Virtual COM6 - The software should now show Running OK!
- Start go2MONITOR
The software should now display all 10 seconds "1 client connected" - Check in the go2MONITOR status bar if the correct system position is displayed
Last update on 2024-03
Adjust the classification interval
Modify in C:\Users\
Important:
- Before editing, make a backup of the original file
- You do that on your own risk! If you get shorter, some signals no longer get classified.
Last update on 2024-03
Remote control via the command line
t is possible to control go2MONITOR from the command line by sending PYTHON commands
Sample:
start go2MONITOR.exe --no_closeREM Start the go2MONITOR softwaretimeout 60REM wait until windows is startedREM Depending on the os version, another delay command is necessarystart go2MONITOR.exe --execscriptcontent="Signalinput.changeSignalInput('File');" --no_closeREM go2MONITOR: change to file inputtimeout 5start go2MONITOR.exe --execscriptcontent="Signalinput.startFilePlayback('c:\\transfer\\tetra.wav');" --no_closeREM go2MONITOR: load tetra. wav, "\\" is windows specific
Last update on 2024-03
Changing the data output display
All outputs are controlled from XSLT (EXtensible Stylesheet Language Tranformation).
The different style sheets are located in the "c:\Program Files (x86)\go2signals\go2MONITOR xyz\xslt\" directory.
Just add a new one XSLT and it will be added to the go2MONITOR output list during the next program start.
The existing styles sheets can be used as a template to add new ones.
Last update on 2024-05
go2MONITOR with third party decoders
Sometimes protocols are not (yet) implemented into go2MONITOR because of:
- no demand from customers
- experimental codes
- protocol is outdated
- missing standards
- coming later...
If you can not wait until a protocol is implemented or if the required know-how to implement it is not available, then then you may add it yourself (using the DDL) or a 3rd party product
This gives you the possibility to decode additional standards like:
|
|
|
How to route the audio from the go2MONITOR DDC channel to another software product:
- Install VAC (Virtual Audio Cable) or another product that simulates an virtual sound card
- Setup the VAC as the default sound card
- Recommended VAC settings
- SR: 22050 ... 500000
- BPS: 8 ... 32
- NC: 1 ... 2
- Maxinst: 20
- Mspe int: 10
- Stream fmt: Cable range
- Connected source: Line
- Clockcorr: 100%
- In the third party software select VAC as the input
- Enable audio output in the go2MONITOR channel (if required, you can add an dedicated optimized audio demodulator setting to the AudioDemodTypes.xml)
- Now your additional software is connected to the go2MONITOR channel
- Start decoding with your third party tool
Products tested with go2MONITOR:
- JAERO (INMARSAT AERO decoder)
- CW Skimmer
- MIXW
- MULTIPSK
- W-CODE
- W-61PC
- PDW Paging Decoder (in go2MONITOR select the FM-output and in PDW the dicriminator input)
- ....
Last update on 2024-05
go2MONITOR: How to stream IQ data to go2DECODE
- Define a new signal source in go2DECODE/Extras/Options (e.g. go2MONITOR CH1).
- For a connection to go2MONITOR channel #1, connect to port 36700, for channel #2 connect to port 36701......
- Start working with go2MONITOR
- Select the signal to be analyzed/processed with go2MONITOR.
- Change the go2DECODE input to the new defined device (e.g. go2MONITOR CH1)
- Now your data are streamed to go2DECODE for further processing
Last update on 2024-03
Why Ares Some TCP-IP Receivers not working?
When entering the IP address in the "Receiver Configuration" it sometimes happens that if only one or two digit numbers are entered the remaining space is filled with blanks.
This is a problem for go2M.
Open the conf file in the user directory with an editor (Notepad++) and remove the blanks in the IP address.
Another "trick" if it's not working:
If the receiver can't be accessed, open the conf file with Notepad++ and save again immediately.
Last update on 2024-03
Why Are Some Older Receiver Configurations No Longer Working?
The receiver.conf file was extended.
Add
<add value="WB" key="ReceiverGroups"/>
to the
Add
<add value="auto" key="UDPStreaming_Port"/>
to the
For a narrowband receiver use "NB" instead if "WB"
Also consult a current receiver driver and compare what is new.
Last update on 2024-03
How to display the FHSS (Frequency Hopper Data)
In the ResultViewer set a filter on Transmission Type = FHSS
Last update on 2024-03
How-to-run-the-rcm-on-a-different-computer
Sometimes a receiver connected by USB must be controlled over a longer distance. Then a second computer running the RCM is required.
Requierement
- CodeMeter dongle and default.maw for go2MONITOR
- go2MONITOR
go2MONITOR Computer: Computer running go2MONITOR
RCM Computer: Computer running RCM, connected to the receiver
Setup go2MONITOR Computer
- Disable the firewall (can later be configured)
- Install the go2MONITOR software
- Open SystemConfiguration.xml
- Replace in FLD_IP_ADDRESS the localhost (127.0.0.1) with the IP-address of the RCM Computer:
<MSG_OBJ_ADD>
 <FLD_NAME/>
 <FLD_OBJ_TYPE>8</FLD_OBJ_TYPE>
 <FLD_OBJ_ID>$RECEIVER_1_ID$</FLD_OBJ_ID>
 <FLD_IP_ADDRESS><strong>185.2.4.22</strong></FLD_IP_ADDRESS>
 <FLD_IP_PORT>36940</FLD_IP_PORT>
 <FLD_CREATE_ALL_RECEIVERS/>
 <FLD_OPTIONAL/>
</MSG_OBJ_ADD>
- Install the dongle
- Start go2MONITOR and if requested load the go2MONITOR Computer default.maw (will be saved in the user directory)
- Close go2MONITOR
Setup RCM Computer
- Disable firewall (can later be configured)
- Install the go2MONITOR software (later you can remove unused files)
- Install the dongle
- Start go2MONITOR and if requested load the go2MONITOR Computer default.maw (will be saved in the user directory)
- Setup the receiver with the wideband receiver configuration tool
- Open in the user directory the rcm.conf file.
- Replace in key="AllowUDPStreaming"] the value with "0"
<add key="AllowUDPStreaming" value="<strong>0</strong>"/>
- Restart go2MONITOR and check if you can control the receiver.
- Close go2MONITOR
- If behind a firewall or router open port 36940 for control and 36300-36302 for streaming
- Remove the dongle from the RCM computer
Operating
- Start RCM.exe on the RCM Computer (DOS window ), see picture.
- Check if RCM works correct
- Start go2MONITOR on the go2MONITOR Computer
- Check if you can connect to the receivers you did setup on the RCM computer
Remarks:
- The USB-dongle should be connected to the go2MONITOR if no license sharing is activated.
- Be careful with higher band widths.
- Make sure that the required ports (even after a computer restart) are open on all participating computers, routers, firewalls, etc.)
- Check with PROCITEC if no additional license for the RCM is required
Last update on 2024-03
Streaming from SDR Console
Use Cases
- You can use SDR-Console as a front end for go2MONITOR
- Extensive list of additionally supported receivers and receiver servers.
- Data recording with independent tool
- Remote monitoring using the SDR-Console or the Airspy Servers.
Setup your own network of remote radios or use existing worldwide available radios on servers running Raspberry Pi, Odroid, Windows or Linux
Setup
- Required minimum SDR-Console Release: 3.0.23
- To display the go2MONITOR panel select "More Options" from the "View" pane in the ribbon bar of SDR-Console then restart SDR-Console.
- Select the go2MONITOR configuration screen in SDR-Console and config
- Port for the streaming
- Add Meta Chunk..... if files have to be used with go2MONITOR
- Define the port as SDR-Console input in go2MONITOR ( c:\Users\xxxxx\go2signals\go2MONITOR 20.1\StreamInputs.conf)

- Start go2MONITOR and select the SDR-Console input

In this example an ADEDRI SDR was used - The standard SDR console delivers only the wideband stream
shoc can also deliver an extended version of the SDR-Console, which offers the narrowband streams of the all the "Radios" (DDC's)
Additional information
Last update on 2023-07
Add own modems / decoders in go2MONITOR
You will need go2DECODE to create your modem and decoder first. From there, you should save your modem as a *.ver file and your decoder to a *.bin file. VER file should be copied to your
The location of the
• Windows®
%USERPROFILE%\go2SIGNALS\go2MONITOR x.y
• Linux®
$HOME/go2SIGNALS/go2MONITOR x.y
Latest update 2023-07 helpdesk
No task displayed in TaskActivity
Problem:
I’ve created an AMT-Mission and a corresponding task but no task is shown within TaskActivity.
Solution:
In the Task Activity view, tasks are only displayed for missions which are currently active. Make sure the corresponding mission for the task you would like to see has been activated.
Latest update 2023-07 helpdesk
Reset GUI layout to the default state
Problem:
The layout of my GUI is messed up - I would like to bring it in the default state. How can I do it?
Solution:
Click on the
Latest update 2023-07 helpdesk
Deactivated / grayed-out modems in the modem list
Problem:
Some modems in the modem list in narrowband channel are deactivated / grayed-out. Why?
Solution:
Some modems are not suitable for automatic modem recognition, so they will be deactivated if you are in search mode. Which modems are suitable for automatic search can be seen in the Auto-recognition column in the Modem List Editor.
Also, if a modem list contains more than 200 modems, all modem will be disabled and appropriate message will be displayed indicating that you have to select a shorter modem list.
Latest update 2023-07 helpdesk
go2MONITOR on a PC without a network card
Problem:
How can I use go2MONITOR on a PC without a network card?
Solution:
If there are problems in starting go2MONITOR when no LAN is activated, add the Microsoft Loopback Adapter.
- In the Device Manager, select
- In the Add Hardware wizard, select
.
In the Common hardware types list, clickand then click . - In the Manufacturer list, click
.
In the Network Adapter list, clickand then click twice.
If a message about driver signing appears, click. - In the Completing the Add Hardware Wizard dialog box, click
, and then click
Latest update 2023-07 helpdesk
WAV files are missing from an offline AMT mission
Problem:
I’ve created an offline AMT mission with a task containing only “Recognition + Decoding” narrowband channel action. I see many recording results in database but the WAV files are missing. Why?
Solution:
Since it is an offline mission, the software has to store narrowband recordings in order to perform recognition & decoding. The files are deleted afterwards (because recording action was not selected in a task), but the recording information stays visible in the database.
Latest update 2023-07 helpdesk
Search emissions button in the Emissions View
Problem:
The Find emissions button in the Emissions view seems to be missing.
Solution:
An AMT mission is probably currently active in your system. You can check this in the Missions view. After you activate an AMT mission, wideband classification switches into continuous mode. Therefore, snapshot classification is not available. After you deactivate your active mission, the
Latest update 2023-07 helpdesk
Unexpected results on an AMT-Task
Problem:
I’ve created an AMT-Task but get no expected results. What am I doing wrong?
Solution:
Check in the Task Activity view if there are any triggers and/or started/dropped actions for your task. Use the task-based filter in the Emission view to interactively monitor if there are any live emissions which fit your task trigger.
Latest update 2023-07 helpdesk
How to open Windows Firewall for go2MONITOR?
When go2MONITOR starts it will ask you to open the firewall for ceratin applications (if your firewall is enabled).
Instructions:
When go2MONITOR is installed in
C:\Program Files (x86)\go2SIGNALS\go2MONITOR\
You can also open the firewall by using the follwing commands:
netsh advfirewall firewall add rule name="go2M/RCM" dir=in action=allow program="C:\Program Files (x86)\go2SIGNALS\go2MONITOR\32Bit\rcm.exe" enable=yes
netsh advfirewall firewall add rule name="go2M/APC" dir=in action=allow program="C:\Program Files (x86)\go2SIGNALS\go2MONITOR\apc.exe" enable=yes
netsh advfirewall firewall add rule name="go2M/APC-Ctrl" dir=in action=allow program="C:\Program Files (x86)\go2SIGNALS\go2MONITOR\apc_controller.exe" enable=yes
netsh advfirewall firewall add rule name="go2M/AS-Ctrl" dir=in action=allow program="C:\Program Files (x86)\go2SIGNALS\go2MONITOR\as_controller.exe" enable=yes
netsh advfirewall firewall add rule name="go2M/BCU" dir=in action=allow program="C:\Program Files (x86)\go2SIGNALS\go2MONITOR\bcuapp.exe" enable=yes
netsh advfirewall firewall add rule name="go2M/DANA" dir=in action=allow program="C:\Program Files (x86)\go2SIGNALS\go2MONITOR\dana.exe" enable=yes
netsh advfirewall firewall add rule name="go2M/go2M" dir=in action=allow program="C:\Program Files (x86)\go2SIGNALS\go2MONITOR\go2MONITOR.exe" enable=yes
netsh advfirewall firewall add rule name="go2M/NCL" dir=in action=allow program="C:\Program Files (x86)\go2SIGNALS\go2MONITOR\narrowbandclassifier.exe" enable=yes
netsh advfirewall firewall add rule name="go2M/P2W" dir=in action=allow program="C:\Program Files (x86)\go2SIGNALS\go2MONITOR\pxgf2wav.exe" enable=yes
netsh advfirewall firewall add rule name="go2M/PY" dir=in action=allow program="C:\Program Files (x86)\go2SIGNALS\go2MONITOR\python.exe" enable=yes
netsh advfirewall firewall add rule name="go2M/PYw" dir=in action=allow program="C:\Program Files (x86)\go2SIGNALS\go2MONITOR\pythonw.exe" enable=yes
netsh advfirewall firewall add rule name="go2M/RCM-Cfg" dir=in action=allow program="C:\Program Files (x86)\go2SIGNALS\go2MONITOR\rcmconf.exe" enable=yes
netsh advfirewall firewall add rule name="go2M/RCL" dir=in action=allow program="C:\Program Files (x86)\go2SIGNALS\go2MONITOR\remotecmdline.exe" enable=yes
netsh advfirewall firewall add rule name="go2M/ResultViewer" dir=in action=allow program="C:\Program Files (x86)\go2SIGNALS\go2MONITOR\resultviewerapp.exe" enable=yes
netsh advfirewall firewall add rule name="go2M/SiS" dir=in action=allow program="C:\Program Files (x86)\go2SIGNALS\go2MONITOR\signalserver.exe" enable=yes
netsh advfirewall firewall add rule name="go2M/W2S" dir=in action=allow program="C:\Program Files (x86)\go2SIGNALS\go2MONITOR\wave2stream.exe" enable=yes
netsh advfirewall firewall add rule name="go2M/RCM" dir=out action=allow program="C:\Program Files (x86)\go2SIGNALS\go2MONITOR\32Bit\rcm.exe" enable=yes
netsh advfirewall firewall add rule name="go2M/APC" dir=out action=allow program="C:\Program Files (x86)\go2SIGNALS\go2MONITOR\apc.exe" enable=yes
netsh advfirewall firewall add rule name="go2M/APC-Ctrl" dir=out action=allow program="C:\Program Files (x86)\go2SIGNALS\go2MONITOR\apc_controller.exe" enable=yes
netsh advfirewall firewall add rule name="go2M/AS-Ctrl" dir=out action=allow program="C:\Program Files (x86)\go2SIGNALS\go2MONITOR\as_controller.exe" enable=yes
netsh advfirewall firewall add rule name="go2M/BCU" dir=out action=allow program="C:\Program Files (x86)\go2SIGNALS\go2MONITOR\bcuapp.exe" enable=yes
netsh advfirewall firewall add rule name="go2M/DANA" dir=out action=allow program="C:\Program Files (x86)\go2SIGNALS\go2MONITOR\dana.exe" enable=yes
netsh advfirewall firewall add rule name="go2M/go2M" dir=out action=allow program="C:\Program Files (x86)\go2SIGNALS\go2MONITOR\go2MONITOR.exe" enable=yes
netsh advfirewall firewall add rule name="go2M/NCL" dir=out action=allow program="C:\Program Files (x86)\go2SIGNALS\go2MONITOR\narrowbandclassifier.exe" enable=yes
netsh advfirewall firewall add rule name="go2M/P2W" dir=out action=allow program="C:\Program Files (x86)\go2SIGNALS\go2MONITOR\pxgf2wav.exe" enable=yes
netsh advfirewall firewall add rule name="go2M/PY" dir=out action=allow program="C:\Program Files (x86)\go2SIGNALS\go2MONITOR\python.exe" enable=yes
netsh advfirewall firewall add rule name="go2M/PYw" dir=out action=allow program="C:\Program Files (x86)\go2SIGNALS\go2MONITOR\pythonw.exe" enable=yes
netsh advfirewall firewall add rule name="go2M/RCM-Cfg" dir=out action=allow program="C:\Program Files (x86)\go2SIGNALS\go2MONITOR\rcmconf.exe" enable=yes
netsh advfirewall firewall add rule name="go2M/RCL" dir=out action=allow program="C:\Program Files (x86)\go2SIGNALS\go2MONITOR\remotecmdline.exe" enable=yes
netsh advfirewall firewall add rule name="go2M/ResultViewer" dir=out action=allow program="C:\Program Files (x86)\go2SIGNALS\go2MONITOR\resultviewerapp.exe" enable=yes
netsh advfirewall firewall add rule name="go2M/SiS" dir=out action=allow program="C:\Program Files (x86)\go2SIGNALS\go2MONITOR\signalserver.exe" enable=yes
netsh advfirewall firewall add rule name="go2M/W2S" dir=out action=allow program="C:\Program Files (x86)\go2SIGNALS\go2MONITOR\wave2stream.exe" enable=yes
Latest update 2023-07 helpdesk
Change the language of the user interface after installation
Problem:
How can I change the language of the GUI after installation?
Solution:
To do this, it is necessary to open and modify the prolang.cfg file in the installation folder with a text editor. Valid entries are ”de“ for German and “en“ for English. go2MONITOR must be restarted after the change.
Latest update 2023-07 helpdesk
Results in the ResultViewer
Problem:
I cannot find my results in the ResultViewer. What should I do?
Solution:
There may be filter settings preventing the results from appearing. To solve this, click on the
If your hard disk is almost full, your oldest data will also be automatically deleted.
Latest update 2023-07 helpdesk
Find log files for analysis of software problems
Problem:
I have a problem with the software and the support team would like me to send log files for the analysis. Where do I find these?
Solution:
You will find log files in the
The location of the
• Windows®
%USERPROFILE%\go2SIGNALS\go2MONITOR x.y
• Linux®
$HOME/go2SIGNALS/go2MONITOR x.y
Latest update 2023-07 helpdesk
Task-based filter in emissions view is not working properly
Problem:
I am trying to use the task-based filter in the Emission view, but it does not work correctly. Why?
Solution:
If a mission or task has changed, they won’t be reloaded/updated automatically in a task-based filter. You have to manually update using the
Latest update 2023-07 helpdesk
No Signal from Receiver
Problem:
I’ve added my receiver but get no signal from it.
Solution:
In the case of a network receiver not being recognized, please double-check the IP-addresses and ports you’ve entered in the Receiver Configuration tool. Try deactivating your firewall. Check if Jumbo-Frames are activated on your network card (needed for IZT/narda receivers).
If you have multiple receivers in your configuration, delete them and add them again one-by-one.
Latest update 2023-07 helpdesk
Grey Main Window after Start
Problem:
After starting the software, the main window stays gray and I cannot work with it.
Solution:
The splash screen can be closed by clicking on it. Open the resources view via the views menu and check if any components are in a red/yellow state. If yes, check if there are any error messages shown as items under that component in the tree-view.
For example, the result storage component will be in the error state if there is less than 1 % free space on the hard disk.
Try closing the software and starting again.
Contact our customer service if none of the above helps.
service@procitec.de
Latest update 2023-07 helpdesk
go2DECODE
DANA: Remote control using comand line
Just start DANA in a DOS box with the parameter /? and you will see a list of all possible commands.
Last update on 2023-07
Can I Use the Sound Card Input in go2MONITOR?
DANA is able to connect to sound cards, this is necessary if working with web radiuos.
- In go2MONITOR check that you have a go2DECODE/DANA input (if it is missing, set it up for port 44001)
- Select go2DECODE/DANA as the input
- Start DANA
- Playback files or connect to a sound card
- The functionality of DANA is documented in the go2DECODE user manual.
Remarks:
- Add additional DDC channel bandwidths for go2MONITOR. I recommend 1.5, 2.0, 2.5 and 3.0 kHz. This makes tuning much easier ( see: go2MONITOR, how to add additional DDC bandwidths)
Last update on 2024-03
How to decode the first signal?
REQUIREMENTS:
- go2DECODE software installed
- License dongle connected, maw file installed
STEPS:
- Start go2DECODE
- Set Input to DANA
- Check that DANA is in "File" mode

- Open from c:\Program Files\procitec\go2decode\signals\HF\baudot\ the wav file baudot_sync_200bd_850hz.wav
- DANA: Enable: remove DC, IF from wav file, Loop mode
- DANA: Start playback

- go2DECODE: Menu "Extra", select "Modem recognition", select "Start"
- Check that Spectrum/Sonagram shows the signal centered
- After a few seconds decoding should start.

Last update on 2024-03
Changing the font size
The font size can be adjusted for high-resolution monitors as follows:
- By setting the parameter "--font-size
" at startup via the command line. The font size is only changed for the current call. - In the user directory under "go2SIGNALS/go2DECODE
" as a permanent entry in the file sda.conf. The key under the entry has to be updated or created.
Latest update 2023-07 helpdesk
Spinbox features
What spinbox functions are there?
The values of all spinboxes can be changed using the mouse wheel. The digit marked by the cursor changes. Furthermore, the unit can be changed by right-clicking on the spinbox and previously entered values are displayed again.
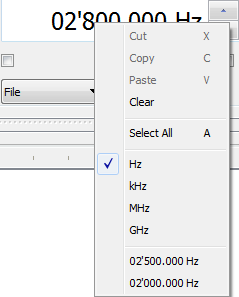
Spinbox menu
Latest update 2023-07
Real and complex signals
Problem:
How can I play the file as a complex signal?
Solution:
A complex signal consists of 2 real channels (I and Q components). The spectrum of a complex signal generally differs at positive and negative frequencies. Real signals are single-channel. Since the spectrum of a real signal is symmetric around 0 Hz, the redundant negative frequencies are usually not displayed in spectrum representations.
In DANA, files with 2 channels are played by default as a real signal and only the first channel is used. In order to play the file in as a complex signal, you have to right-click on the path of the corresponding file in the file list and set the mode to IQ. The signal must be selected and played at the same time.
Latest update 2023-07 helpdesk
Drag-and-Drop
Problem:
Can I use drag-and-drop in go2DECODE?
Solution:
Modems and modem lists can be added via drag-and-drop to go2DECODE. This also applies to WAV files in DANA. It is possible to select multiple files at the same time.
Latest update 2023-07 helpdesk
Location license file
Problem:
Where can I find the license file?
Solution:
The license file "default.maw" is stored and searched for in the user directory:
.../
Alternatively, it can be stored in the installation directory in the subfolder applications.
Latest update 2023-07 helpdesk
Change language of GUI
Problem:
I want to change the language of GUI. How can I do this?
Solution:
To do this, it is necessary to open and modify the file „prolang.cfg" in the installation folder with a text editor. Valid entries are „de" for German and „en" for English. go2DECODE must be restarted after the change.
Latest update 2023-07 helpdesk
Interface for connecting go2DECODE with go2MONITOR
Problem:
How can I connect go2DECODE to go2MONITOR?
Solution:
Define a new signal source in the menu
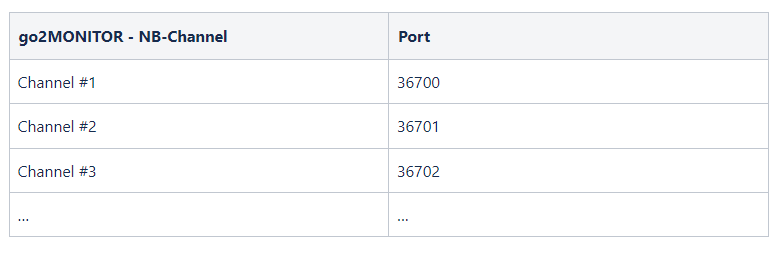
And add them to the Signal Sources as displayed below
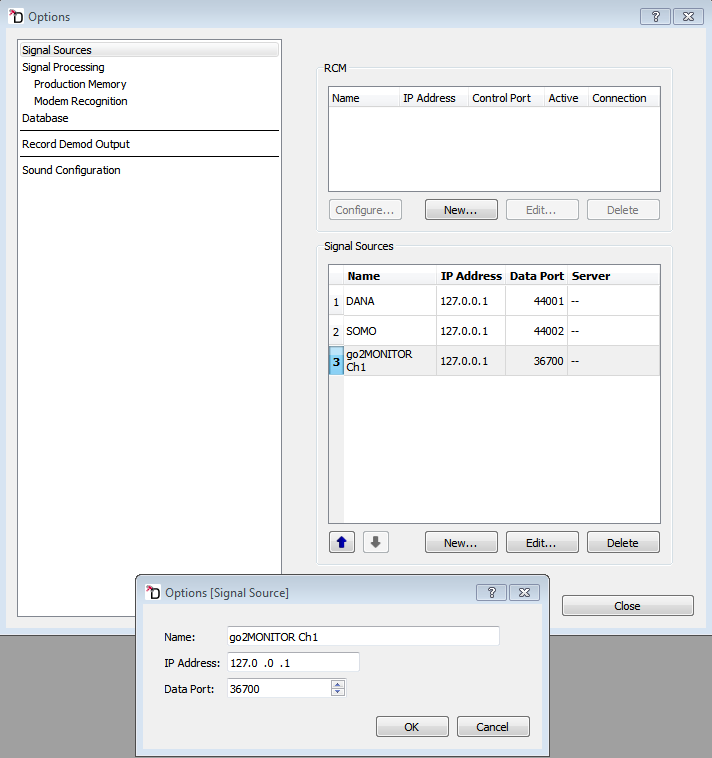
Define go2MONITOR Input in go2DECODE
Latest update 2023-07 helpdesk
Unattended Installation on Windows®
Problem
How can an unattended installation be carried out?
Solution:
To perform an unattended, also called silent or automatic, installation the following command may be used:
Setup.exe /language 1033 /msiparam LIMITUI=64
Latest update 2023-07 helpdesk
File extensions
Problem:
What is the meaning of the different file extensions?
Solution:
- ".ver" – Single Modem
- ".cmf" – List of modems
- ".cma" – List of modems with decoder
- ".txt" – here: decoder source code
- ".bin" – Decoder (Binary)
- ".wav" – signal file, real or complex
- ".para" – signal parameters for wav files (like receive frequency)
Latest update 2023-07 helpdesk
Installed modems
Problem:
I miss some modems. How can I add them?
Solution:
The displayed modems in the result display are not all installed or existing modems and doesn’t represent the complete modem database. Modems can be added via
Latest update 2023-07 helpdesk
Start the SDA with a different configuration file
Problem:
How can I start the SDA with a different configuration file?
Solution:
Example:
sda.exe –conf C:\Temp\my_sda.conf
As default, the SDA looks for its configuration file „sda.conf" first in the user folder and then in the installation folder. On the command line you can parameterize the configuration which will be loaded.
Latest update 2023-07 helpdesk
Compressed signal files
Problem:
Why do I have problems with compressed signal files?
Solution:
If signal files have been lossy compressed (e.g. mp3), important signal information (e.g. phase) which are necessary for demodulation are usually lost. This difference is not acoustically audible but prevents decoding for most modems. Only simple modems, e.g. morse, are rather uncritical in this regard. Signal files, even after reconversion of mp3 or similar, are therefore mostly unusable.
Latest update 2023-07 helpdesk
Connection with WebSDR
Problem:
How can I integrate a WebSDR?
Solution:
Through DANA, both complex and real live audio signals can be used, e.g. to integrate a WebSDR. To do this, the audio output must be redirected to an audio input in the operating system. Under Windows®, e.g. "Virtual Audio Cable" can be used. In DANA, the source must be switched to sound, selecting either real or complex (IQ). The audio input is selected under
Latest update 2023-03 helpdesk
Result location
Problem:
Where can I find the produced results?
Solution:
Results produced are stored by go2DECODE in the user folder under
.../
in addition to the output in the user interface.
Latest update 2023-07 helpdesk
Modem is not found or decoded
Problem:
Why is the modem not found or not decoded?
Solution:
There are several possible reasons:
- Nominal frequency or search range is not set correctly
- Signal quality is too bad
- The modem is not included in the modem list, not selected or not active
- The mode is set to production: only the selected modem is active. Other modems in the list are ignored.
Latest update 2023-07 helpdesk
go2ANALYSE
Incorrect display after workflow releoad
This "bug" is possible if after program start no window from the function kit was selected.
Just select on function like "Delete, "Tag bits" and close it without applying an action ;-)
Last update on 2023-07